Quick post....
If you get the error below when trying to upgrade your iPhone to iOS7 via the beta program:
"The iPhone XXXX could not be restored. An unknown error occured (4027)"
You need to install the "Mobile Device Package Installer" available from the dev centre.
Tuesday, 6 August 2013

Tuesday, 30 July 2013
VMWare Fusion 5 DHCP Assigned Static IP...
In order to have DHCP assigned Static IP addresses on a Fusion 5 Virtual machine you need to modify the following file:
The contents of the file should look like this:

To add a reserved IP you will need the hostname and mac address of your host.
Under the section "DO NOT MODIFY SECTION" add the following:
host <YOURHOSTNAME> {
hardware ethernet <YOUR MAC ADDRESS>;
fixed-address <THE IP TO ASSIGN>;
}
It should look something like this:

My hostname is kingpin.
subnet 172.16.137.0 netmask 255.255.255.0 {
/Library/Preferences/VMware\ Fusion/vmnet8/dhcpd.conf
The contents of the file should look like this:

To add a reserved IP you will need the hostname and mac address of your host.
Under the section "DO NOT MODIFY SECTION" add the following:
host <YOURHOSTNAME> {
hardware ethernet <YOUR MAC ADDRESS>;
fixed-address <THE IP TO ASSIGN>;
}
It should look something like this:

My hostname is kingpin.
My MAC Address is 00:0C:29:70:0D:4B.
The IP I want to assign is 172.16.137.100
Worth noting, when choosing an IP to assign it must be from the subnet specified further up in the file and not be from the range.
For example, in my config file in the "DO NOT MODIFY SECTION" I have:
For example, in my config file in the "DO NOT MODIFY SECTION" I have:
subnet 172.16.137.0 netmask 255.255.255.0 {
range 172.16.137.128 172.16.137.254;
option broadcast-address 172.16.137.255;
option domain-name-servers 172.16.137.2;
option domain-name localdomain;
default-lease-time 1800; # default is 30 minutes
max-lease-time 7200; # default is 2 hours
option netbios-name-servers 172.16.137.2;
option routers 172.16.137.2;
}
}
I have to choose an IP that is within the 172.16.137.0/24 range and is not being used in the current DHCP scope.
172.16.137.1 and 172.137.137.2 are used by VMWare and the IP's from 172.16.137.128 - 172.16.137.254 are reserved in the DHCP scope.
That leaves me with any IP from 172.16.137.3 - 172.16.137.127.
I chose 172.16.137.100 as it is easy to remember and I can start counting up from there.
Simples!
That leaves me with any IP from 172.16.137.3 - 172.16.137.127.
I chose 172.16.137.100 as it is easy to remember and I can start counting up from there.
Simples!
Friday, 19 July 2013
Bumpin' Swipe Locks...
An iOS application I use a fair bit has a simple swipe code authentication. The basic idea is you log in every 24 hours with your username and password, then for the next 24hrs you can use a swipe code rather than have to re-type your password each time you want to view the contents of the app. If you get the swipe code wrong more than twice, you also have to enter your password again.
I decided to take a look at how this worked and see if you could fudge the app so that you never had to enter your password (after initial setup) so it wouldn't time out after 24hrs and if I got the swipe wrong (I've not long had my new hands) I could have more than 2 attempts.
First of all I used clutch (lazy way) to decrypt the binary and then class-dump-z to dump out the classes and methods, I'm not going to go into any detail here on these two tools. There is plenty out there if you google it!
Looking through the class-dump-z output I could see a couple of class's that looked interesting one was called XXXSecurity and the other was called XXXSecurityKeys... hmm.
After a little bit of tinkering with theos (a new favourite tool) I was able to get some additional debug on both of these classes as they were being called. If you use logify as below, it will will create you the output to go into your tweak file.
Once the tweak is installed onto the device it will log all the output into syslog. It logs the class and method as they are called and the values returned, pretty handy.
I started to use the application and could see in syslog that as I swiped across the tiles the application would login and call the following method:
Which was then closely followed by:

So if I could get [XXXSecurity canLoginWithSwipeCode] to always return true (1) I would be rockin' the dance floor. This was pretty simple and is a lot like the removing simple jailbreak detection post I did perviously. I created the tweak below and installed:

Once compiled and installed this worked a treat I could keep trying my swipe code.
After looking at the syslog output for a while I began to wonder what would happen if I used cycript to call the various methods, would the app just pop open? If I could do this I could then attempt to brute force the swipe code by passing values to cycript to try? Swipe codes are pretty simple, theres not much entropy.
I started to play around with cycript and wasn't really getting anywhere, so I began to google as this is a fairly common technique for hacking apps, Jailbreak tweakers do this a lot. After a short time googling I stumbled across this blog and also this blog from Prateek Gianchandani, it was really useful but I wasn't getting anywhere so I dropped Prateek a mail. Prateek responded and was able to point me in the right direction. My Objective C isn't great, I am at best a n00b (but learning fast). He explained that it looked like the method that was being called (see below) was an instance method and I needed to find the reference to the instance.
-[<XXXSecurity: 0x59405c0> loadPasswordWithSwipeCode:147A]
A few more emails backwards and forwards, and a bit of digging in cycript, I eventually found that by calling the following the app would return the logged in users password...
cy# [[XXXSecurity sharedInstance]loadPasswordWithSwipeCode:@"147A"]
@"password123"
If I supplied the wrong swipe code I got null back
cy# [[XXXSecurity sharedInstance]loadPasswordWithSwipeCode:@"1234"]
null
So all I had to do was create a little bash script that would loop round a wordlist of swipe codes and when != null was returned I would have my password... simples!
I knocked up the bash script below to brute force the swipe code and it returned the password quite quickly. Most swipe codes aren't that long so creating an effective wordlist isn't too hard.

The beauty of this attack via cycript is that even though the app has a password attempt limit of 10 attempts set, it's totally ignored when you use cycript to inject code into the runtime. The other methods aren't called so the app doesn't even know it has been abused or how many times the password has been tried.
I decided to reset the swipe code and check that the bash script worked when I tried against a different swipe code, just incase there were any errors.
As I did this I noticed a method being called that looked quite interesting, it looked like there was a specific method for for setting a new swipe code:
If I could call this and set my own swipe code without any verification of the old swipe code or users current passcode, I could then call the method "loadPasswordWithSwipeCode" with the new swipe code I had set and return the logged in users passcode... whoop whoop no more bruteforce required!!
The following worked a charm and I had the users password:
cy# [[XXXSecurity sharedInstance]setSwipeCode:@"0000"]
cy# [[XXXSecurity sharedInstance]loadPasswordWithSwipeCode:@"0000"]
@"password123"
I decided that I should probably disable the swipe code and only use a password from now on, but doing this didn't work. I could still set any swipe code and return the password. In fact this was probably worse as you even wouldn't know the swipe code had been changed.
The only saving grace for this attack is that you need a Jailbreak for it to work else you cannot install cycript, ssh etc. Having said that I'm pretty sure there is probably some jailbreak 0day out there in the wild that hasn't been patched by Apple.
I decided to take a look at how this worked and see if you could fudge the app so that you never had to enter your password (after initial setup) so it wouldn't time out after 24hrs and if I got the swipe wrong (I've not long had my new hands) I could have more than 2 attempts.
First of all I used clutch (lazy way) to decrypt the binary and then class-dump-z to dump out the classes and methods, I'm not going to go into any detail here on these two tools. There is plenty out there if you google it!
Looking through the class-dump-z output I could see a couple of class's that looked interesting one was called XXXSecurity and the other was called XXXSecurityKeys... hmm.
After a little bit of tinkering with theos (a new favourite tool) I was able to get some additional debug on both of these classes as they were being called. If you use logify as below, it will will create you the output to go into your tweak file.
$ /opt/theos/bin/logify.pl yourclass.h > Tweak.xm
Once the tweak is installed onto the device it will log all the output into syslog. It logs the class and method as they are called and the values returned, pretty handy.
I started to use the application and could see in syslog that as I swiped across the tiles the application would login and call the following method:
-[<XXXSecurity: 0x1d8d18d0> canLoginWithSwipe] = 1
Which was then closely followed by:
-[<XXXSecurity: 0x59405c0> loadPasswordWithSwipeCode:147A]
After trying a few more swipes it soon became obvious the swipe pad was laid out as below:


Once compiled and installed this worked a treat I could keep trying my swipe code.
After looking at the syslog output for a while I began to wonder what would happen if I used cycript to call the various methods, would the app just pop open? If I could do this I could then attempt to brute force the swipe code by passing values to cycript to try? Swipe codes are pretty simple, theres not much entropy.
I started to play around with cycript and wasn't really getting anywhere, so I began to google as this is a fairly common technique for hacking apps, Jailbreak tweakers do this a lot. After a short time googling I stumbled across this blog and also this blog from Prateek Gianchandani, it was really useful but I wasn't getting anywhere so I dropped Prateek a mail. Prateek responded and was able to point me in the right direction. My Objective C isn't great, I am at best a n00b (but learning fast). He explained that it looked like the method that was being called (see below) was an instance method and I needed to find the reference to the instance.
-[<XXXSecurity: 0x59405c0> loadPasswordWithSwipeCode:147A]
A few more emails backwards and forwards, and a bit of digging in cycript, I eventually found that by calling the following the app would return the logged in users password...
cy# [[XXXSecurity sharedInstance]loadPasswordWithSwipeCode:@"147A"]
@"password123"
If I supplied the wrong swipe code I got null back
cy# [[XXXSecurity sharedInstance]loadPasswordWithSwipeCode:@"1234"]
null
So all I had to do was create a little bash script that would loop round a wordlist of swipe codes and when != null was returned I would have my password... simples!
I knocked up the bash script below to brute force the swipe code and it returned the password quite quickly. Most swipe codes aren't that long so creating an effective wordlist isn't too hard.

The beauty of this attack via cycript is that even though the app has a password attempt limit of 10 attempts set, it's totally ignored when you use cycript to inject code into the runtime. The other methods aren't called so the app doesn't even know it has been abused or how many times the password has been tried.
I decided to reset the swipe code and check that the bash script worked when I tried against a different swipe code, just incase there were any errors.
As I did this I noticed a method being called that looked quite interesting, it looked like there was a specific method for for setting a new swipe code:
-[<XXXSecurity: 0x59405c0> setSwipeCode:0369AB]
If I could call this and set my own swipe code without any verification of the old swipe code or users current passcode, I could then call the method "loadPasswordWithSwipeCode" with the new swipe code I had set and return the logged in users passcode... whoop whoop no more bruteforce required!!
The following worked a charm and I had the users password:
cy# [[XXXSecurity sharedInstance]setSwipeCode:@"0000"]
cy# [[XXXSecurity sharedInstance]loadPasswordWithSwipeCode:@"0000"]
@"password123"
I decided that I should probably disable the swipe code and only use a password from now on, but doing this didn't work. I could still set any swipe code and return the password. In fact this was probably worse as you even wouldn't know the swipe code had been changed.
The only saving grace for this attack is that you need a Jailbreak for it to work else you cannot install cycript, ssh etc. Having said that I'm pretty sure there is probably some jailbreak 0day out there in the wild that hasn't been patched by Apple.
Thursday, 11 July 2013
Remember to removePIE...
A couple of weeks back I was reversing an app and trying to work out what it was doing. I had removed the encryption (the short hand way) using clutch and had the class-dump-z output, but this wasn't quite enough. I needed to go a bit deeper as I wanted to know a bit more about what was going on.
I already had GDB installed on the device so I decided to spark the application up and attach to the running process. This all went well, I then set my self a couple of breakpoints which seem to be excepted. I hit C and continued to debug the app. Each time the app got to the point I was expecting it to stop it would just keep going. Hmmm odd, maybe GDB isn't working quite right, I'lll try LLDB.
I configured LLDB to work remotely and started a session on my laptop, once again configuring the break points I wanted. Again the app just continued to run no problems, wtf. This was getting frustrating, had the developer configured some anti debug tactics. I had a look around and I wasn't seeing any "Segmentation fault: 11" errors on attach so I assumed they hadn't. Both GDB and LLDB were just not stopping on any of the breakpoints I had set.
After much searching, I came across another blogpost that simply said "Can you debug iOS applications if ALSR is set". A £2 coin hit the floor, boom. I had forgotten disable the ALSR protection. I downloaded removePIE from here https://github.com/peterfillmore/removePIE, copied it to my device and ran against the app.
Bingo, my breakpoints were being hit and working perfectly on both GDB and LLDB. I won't forget this again...
If you want to know more about disabling ALSR and how it works check out the right up here http://www.securitylearn.net/2013/05/23/disable-aslr-on-ios-applications/.
I already had GDB installed on the device so I decided to spark the application up and attach to the running process. This all went well, I then set my self a couple of breakpoints which seem to be excepted. I hit C and continued to debug the app. Each time the app got to the point I was expecting it to stop it would just keep going. Hmmm odd, maybe GDB isn't working quite right, I'lll try LLDB.
I configured LLDB to work remotely and started a session on my laptop, once again configuring the break points I wanted. Again the app just continued to run no problems, wtf. This was getting frustrating, had the developer configured some anti debug tactics. I had a look around and I wasn't seeing any "Segmentation fault: 11" errors on attach so I assumed they hadn't. Both GDB and LLDB were just not stopping on any of the breakpoints I had set.
After much searching, I came across another blogpost that simply said "Can you debug iOS applications if ALSR is set". A £2 coin hit the floor, boom. I had forgotten disable the ALSR protection. I downloaded removePIE from here https://github.com/peterfillmore/removePIE, copied it to my device and ran against the app.
Bingo, my breakpoints were being hit and working perfectly on both GDB and LLDB. I won't forget this again...
If you want to know more about disabling ALSR and how it works check out the right up here http://www.securitylearn.net/2013/05/23/disable-aslr-on-ios-applications/.
Tuesday, 2 July 2013
BYOD - Build Your Own Device...
Recently I have changed a few screens on iPhones, iPods and iPads, I have even got the wife doing them for friends and family. The idea was to look at starting this up as an additional service that the business could provide as well as just consultancy. Part of my research has required finding good parts at cheap prices, after a little bit of googling I quickly came across www.alibaba.com. The best way I can think of to describe the Ali Ba Ba website is "Amazon for Chinese manufacturers". There is literally tons of stuff up there that is all manufactured in China and sold at cheap prices, you can buy everything from Light bulbs to ride on electric cars for kids! My only recommendation is don't make out your interested in anything unless you really (really, really, really) want it. I get 2-3 mails a week offering me LED light bulbs from a girl called "Lucy Wu" that will not give up, her emails do provide a bit of light humor as she often tells some round the houses funny story about what she has been up to that week before asking if I want to buy "the best light bulbs in the world".

I ordered the items I needed and 4-5 days later a courrier dropped the package to my door with all the items.


I was hoping that if I got a replacement logic board back that worked I could check what it was talking to by firing it via burp proxy. It doesn't look like I'm going to get one back so this is canceled.
My conclusion from all of this is Apple make money because they are good at this and they make great devices (IMO)! The amount of engineering that goes into getting so many small parts into a device is amazing, maximum respect to the people who do this for a living (including Samsung, BlackBerry et al).
It is possible to assemble a device from parts imported from a shady Chinese supplier but it's really not worth the time, effort and chances are they will be 2nd rate parts. If you are struggling to find the money to buy one, check ebay for a damaged device and replace the bits that are damaged.
Now I have a few spare devices I would love to try and do some "chip off" type forensics... I am expecting a lot of collateral damage doing that and at the moment have no idea where to start!
After a bit of searching around on "Ali Ba Ba" I found nearly all the standard parts you would expect, the typical ones you can find on ebay and amazon such as replacement screens, cameras, batteries, dock connectors etc.
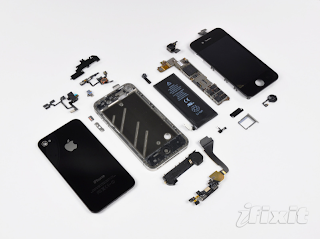
Then I found these, an iPhone 4 logic board:

I dismissed it at first and thought that will never work, they will be fakes. Having ordered a few lcd screens and striking up a bit of a relationship with a supplier I decided to ask if they did the logic boards for devices and were they genuine, would they actually work? After a Skype chat the supplier assured me they would work and they were genuine and unlocked. The price of the boards vary but for a iPhone 4 16GB I was lookign at approx £150. Not a good price, but curiosity got the better of me and I decided to look for all the parts I would need to build a device from the ground up.
Quick trip over to iFixit to find a teardown, sure enough an exploded list of iPhone 4 components and parts as below:

I dropped a message to the supplier I had been using and asked them if they could supply 1 x all of the 23 items listed. Sure, they would go away and find out what was required. 24hrs later they came back with a list and a price for all the items, "how many did I want?". I have to stress, I just wanted to do this as an experiment, this wasn't designed to make me any money, in fact it made me a loss, I could buy a 2nd hand iPhone from ebay a lot cheaper. I wanted to know if I could find all the parts, could I actually build my own iPhone, thats what we used to do with PCs right?!?!
I ordered the items I needed and 4-5 days later a courrier dropped the package to my door with all the items.
Now this wasn't exactly the unboxing experience you get when you purchase a nice new phone, I should have probably made a video of it and posted that up but I only took some pictures, here is what I got.
A dirty old cardboard box with bits in...


Here are the main parts, Front screen, back glass, Logic Board, and Main frame. Attached to the main frame was the volume buttons, mute switch, front camera, back camera, ear speaker, loud speaker, dock / charging point. These were already wired up for me, I hadn't asked for this as I wanted to do it myself but it seems they had tried to be extra helpful. :(

Also included was a bag of screws, of which I had a rough idea what went where but a lot of this was going to be guess work.

I had a quick look at a video from Direct Fix on how to change an LCD screen on the iPhone 4 to give me an idea of what would go where. After about an 1hr I had everything in place and it was the moment of truth... boot up.
I was amazed to see the apple logo, I didn't expect this... after 30 seconds the lock screen appeared... but it was all in Chinese. I managed to guess my way round the menu with another iPhone to hand and did a factory reset, sure enough it took me to the usual start up screen and I was able to choose my language as per a factory reset. I grabbed a SIM I had an put it in, I then attached to the WiFi network and the device registered as expected without any problems. I could attach to the mobile network and use as per a normal phone. Couple of tests to check the vibrate button, volume buttons and charging all worked ok. No problems there, just make a few calls and check that was all good...
This is where I hit problems, I could make a call and receive a call ok but didn't hear anything out of the ear speaker, and the mic didn't seem to work. Maybe I had missed something so stripped the device down and the reassembled again, same outcome no sound and no mic. I had a spare iPhone 4 so I took the logic board out of it and swapped them over, with an original Apple logic board the new parts all worked no problem. I put the new logic board back into the new device and booted up again, but this time the LCD wasn't displaying... arrgghh!!
After much "faffing" around stripping and assembling the two devices I came to the conclusion that the new logic board was in fact faulty so sent it back to the supplier in China. I'm guessing they may have acquired them because they are faulty or not quite up to scratch, who knows.
Once the supplier received the board back they sent to there QA team to test and check if it was faulty. I was kind of expecting the response I got back "Yeah it's all fine, no problems. Want us to send it back?" I was 100% sure it was faulty so asked them to send me a video of the part being tested and working, which they couldn't do. I have now requested a refund and after 4 weeks of hassling them everyday it looks like I might get the money back.
I was hoping that if I got a replacement logic board back that worked I could check what it was talking to by firing it via burp proxy. It doesn't look like I'm going to get one back so this is canceled.
My conclusion from all of this is Apple make money because they are good at this and they make great devices (IMO)! The amount of engineering that goes into getting so many small parts into a device is amazing, maximum respect to the people who do this for a living (including Samsung, BlackBerry et al).
It is possible to assemble a device from parts imported from a shady Chinese supplier but it's really not worth the time, effort and chances are they will be 2nd rate parts. If you are struggling to find the money to buy one, check ebay for a damaged device and replace the bits that are damaged.
Now I have a few spare devices I would love to try and do some "chip off" type forensics... I am expecting a lot of collateral damage doing that and at the moment have no idea where to start!
Friday, 14 June 2013
Defeating "simple" jailbreak detection with theos...
More and more developers are starting to build Jailbreak detection into their apps. A Jailbroken device is classed by many (especially MDM vendors) as compromised. I think this is a fair approach to take, many corporates don't want the risk of devices with un-verified software running on their network.
The problem with jailbreak detection is it can always be defeated. Due to the nature of Objective C it will always be possible to locate the method that is performing the detection and hook it so that it responds in the manner the original developer didn't intend.
When I first started to look at this I wasn't aware of xCon, if you are not interested in how to defeat simple jailbreak detection and just want to get round some non trivial Jailbreak detection in an app grab it from Cydia. The guys have done a good job to cover a lot of apps and for most it works well. You will probably find that it works on some apps that aren't listed too.
The process for patching out Jailbreak detection is something like this:
Step 1 - Decrypt application
There is a long way to decrypt iPhone applications and a quick way. LightBulbOne's blog is a good read and has details on what to do if you want to try the longer way. I prefer the quick way (some might say lazy) using tools. The best tool I have found so far is clutch. Having done it the long way I would suggest you use clutch! You can find clutch out on the internets and on some Cydia repos, it's commonly used by "Crackers" to pirate apps so sometimes goes missing or gets taken down.

To use clutch simply type the following at a shell prompt.
# ./clutch "name of your app"
Clutch will then automagically create an .ipa file of your application which you can then extract the decrypted binary from.
Step 2 - Copy the .ipa to your laptop and extract
This is a pretty straight forward step, just use Cyberduck or SCP to copy the .ipa to a folder or location on your laptop you can easily access. Using your favourite unarchiver extract the contents of the .ipa to a folder. I just use unzip from a cmd line.

Step 3 - Dump the class info
There is a great tool called class-dump-z that if you have looked at reversing iOS apps before you will be well aware of. You will need to grab it from here.
Once you have got class-dump-z you will need to run it against the application binary that can be found in the directory .../Payload/<nameofapp>.app/ . Usually the executeable will match the name of the application. To dump the class run the following command:
# class-dump-z Payload/DME\ 4.app/DME\ 4 > dump.txt

Step 4 - Locate method performing Jailbreak Detection
Next, open up the dump.txt file you just created using textpad or another editor. I have been using sublime recently and love it as you can set the language and get some colour coding to help you. Next look through the file or search for anything with "jail", "break" or "detection" in.

Here we can see a class "DMEDevice" that has a method of type BOOL called "isJailBroken". Now we can assume as this is a BOOL type that it is going to either return false or true. If we can hook this method and force it to always return false then we can probably evade the jail break detection.
Step 5 - Hooking with Theos
Theos is a tool created by Dusten Howett and is used for jailbreak development to create .deb packages and install them on to your device there are some good articles and Wikis on installing theos check out the links below if you haven't got it installed already:
http://iphonedevwiki.net/index.php/Theos
http://iphonedevwiki.net/index.php/Theos/Getting_Started
http://brandontreb.com/beginning-jailbroken-ios-development-your-first-tweak
Once you have got theos installed you will need to create a new instance to do this use the (nic.pl script) following:
# $THEOS/bin/nic.pl
This will launch the menu, select option 5 "Tweak" and then fill in the relvant details.

The most important one to get right is the "MobileSubstrate Bundle filter". This tells your newly created tweak the application it needs to hook. If you don't know this you will be able to locate it in the file:
/var/mobile/Library/Caches/com.apple.mobile.installation.plist
It's a binary plist so you will need to use plutil that comes with com.ericasadun.utilities and downloadable from cydia. Simply type the following and then look for the "MobileSubstrate Bundle filter".
# plutil /var/mobile/Library/Caches/com.apple.mobile.installation.plist | grep "CFBundleName" -B1 | grep <App Name> -B1
Where <App Name> is the name of the application your are looking for.

Next you will need to add the required code into the file Tweak.xm file in your project directory.

Using your favoured editor open Tweak.xm and remove all the example code that is in the file. Next add the following:
%hook <Name of Class>
+(BOOL)<Name of Method> {
// Call the original method
%orig;
//Pop up an alert to show you got hooked, this is just for debug, you don't really need it
UIAlertView *alert = [[UIAlertView alloc] initWithTitle:@"isa56k pwning..."
message:@"No Jailbreaks Here"
delegate:nil
cancelButtonTitle:@"Bye Bye"
otherButtonTitles:nil];
[alert show];
[alert release];
// The most important bit, return false and lie about the jailbreak status!!
return false;
}
%end
The items in RED above need to match up with your application. This is what my Tweak.xm looks like:

The most important part of the tweak is the really the final line of code in the function "return false". Every time that [DMEDevice isJailbroken] is now called in the application it will be replaced with our patch / tweak fooling the app telling it that it is not Jailbroken.
I have included a UI Alert so that we know our patch is being run, without this it can be difficult to tell that it has actually been called. You could remove this code once you are happy your tweak is working.
As we are using UIAlertView for a bit of debug we need to also include UIKit framework in our Makefile as well as a few other bits and pieces. Open up the Makefile in your project directory and add the following (some will already exist).
GO_EASY_ON_ME = 1
#The ip of your device that you will install the tweak on
export THEOS_DEVICE_IP=<YOUR DEVICE IP>
#The architecture you wish to compile for
export ARCHS=armv7
export TARGET=iphone:latest:4.3
export SDKVERSION = 6.1
include theos/makefiles/common.mk
TWEAK_NAME = isnotjailbroken
isnotjailbroken_FILES = Tweak.xm
# Add this line in so that the UIKit framework is included
isnotjailbroken_FRAMEWORKS = UIKit
include $(THEOS_MAKE_PATH)/tweak.mk
It's worth noting that when adding in a framework the tweakname must match as below in red:
TWEAK_NAME = isnotjailbroken
isnotjailbroken_FILES = Tweak.xm
# Add this line in so that the UIKit framework is included
isnotjailbroken_FRAMEWORKS = UIKit
It took me ages to spot isnotJailbroken had an uppercase J when debugging an error!!
Here is my Makefile..

Step 6 - Install and Run
The final step is to make, package and install the tweak on to the jailbroken device. from inside your project directory type the following:
#sudo make package install
This should compile and then install the patch on your jailbroken device. I have got public key auth set up on my iOS test device so that I am not prompted to enter a password, but you maybe prompted to enter your SSH password for the devices root account at this point.

Next launch the application and check that you get the alert pop up, if you do then your tweak / hook is being called :)

This is only very simple Jailbreak detection, other apps have started to mask when they are checking for jailbreak detection and exactly how they are doing it. I believe some MDM vendors regularly change the methods and the code that checks to keep hackers on their toes.
The problem with jailbreak detection is it can always be defeated. Due to the nature of Objective C it will always be possible to locate the method that is performing the detection and hook it so that it responds in the manner the original developer didn't intend.
When I first started to look at this I wasn't aware of xCon, if you are not interested in how to defeat simple jailbreak detection and just want to get round some non trivial Jailbreak detection in an app grab it from Cydia. The guys have done a good job to cover a lot of apps and for most it works well. You will probably find that it works on some apps that aren't listed too.
The process for patching out Jailbreak detection is something like this:
- Decrypt application
- Copy to your mac
- Dump classes using class-dump-z
- Find class that checks for jailbreak detection
- Create a patch with theos to hook it.
- Install & re run application.
For this you will need:
Here it is in a bit more detail....
- An Jailbroken iOS device with mobile substrate installed
- A mac with Theos installed
Here it is in a bit more detail....
There is a long way to decrypt iPhone applications and a quick way. LightBulbOne's blog is a good read and has details on what to do if you want to try the longer way. I prefer the quick way (some might say lazy) using tools. The best tool I have found so far is clutch. Having done it the long way I would suggest you use clutch! You can find clutch out on the internets and on some Cydia repos, it's commonly used by "Crackers" to pirate apps so sometimes goes missing or gets taken down.

To use clutch simply type the following at a shell prompt.
# ./clutch "name of your app"
Clutch will then automagically create an .ipa file of your application which you can then extract the decrypted binary from.
Step 2 - Copy the .ipa to your laptop and extract
This is a pretty straight forward step, just use Cyberduck or SCP to copy the .ipa to a folder or location on your laptop you can easily access. Using your favourite unarchiver extract the contents of the .ipa to a folder. I just use unzip from a cmd line.

Step 3 - Dump the class info
There is a great tool called class-dump-z that if you have looked at reversing iOS apps before you will be well aware of. You will need to grab it from here.
Once you have got class-dump-z you will need to run it against the application binary that can be found in the directory .../Payload/<nameofapp>.app/ . Usually the executeable will match the name of the application. To dump the class run the following command:
# class-dump-z Payload/DME\ 4.app/DME\ 4 > dump.txt

Step 4 - Locate method performing Jailbreak Detection
Next, open up the dump.txt file you just created using textpad or another editor. I have been using sublime recently and love it as you can set the language and get some colour coding to help you. Next look through the file or search for anything with "jail", "break" or "detection" in.

Here we can see a class "DMEDevice" that has a method of type BOOL called "isJailBroken". Now we can assume as this is a BOOL type that it is going to either return false or true. If we can hook this method and force it to always return false then we can probably evade the jail break detection.
Step 5 - Hooking with Theos
Theos is a tool created by Dusten Howett and is used for jailbreak development to create .deb packages and install them on to your device there are some good articles and Wikis on installing theos check out the links below if you haven't got it installed already:
http://iphonedevwiki.net/index.php/Theos
http://iphonedevwiki.net/index.php/Theos/Getting_Started
http://brandontreb.com/beginning-jailbroken-ios-development-your-first-tweak
Once you have got theos installed you will need to create a new instance to do this use the (nic.pl script) following:
# $THEOS/bin/nic.pl
This will launch the menu, select option 5 "Tweak" and then fill in the relvant details.

The most important one to get right is the "MobileSubstrate Bundle filter". This tells your newly created tweak the application it needs to hook. If you don't know this you will be able to locate it in the file:
/var/mobile/Library/Caches/com.apple.mobile.installation.plist
It's a binary plist so you will need to use plutil that comes with com.ericasadun.utilities and downloadable from cydia. Simply type the following and then look for the "MobileSubstrate Bundle filter".
# plutil /var/mobile/Library/Caches/com.apple.mobile.installation.plist | grep "CFBundleName" -B1 | grep <App Name> -B1
Where <App Name> is the name of the application your are looking for.

Next you will need to add the required code into the file Tweak.xm file in your project directory.

Using your favoured editor open Tweak.xm and remove all the example code that is in the file. Next add the following:
%hook <Name of Class>
+(BOOL)<Name of Method> {
// Call the original method
%orig;
//Pop up an alert to show you got hooked, this is just for debug, you don't really need it
UIAlertView *alert = [[UIAlertView alloc] initWithTitle:@"isa56k pwning..."
message:@"No Jailbreaks Here"
delegate:nil
cancelButtonTitle:@"Bye Bye"
otherButtonTitles:nil];
[alert show];
[alert release];
// The most important bit, return false and lie about the jailbreak status!!
return false;
}
%end
The items in RED above need to match up with your application. This is what my Tweak.xm looks like:

The most important part of the tweak is the really the final line of code in the function "return false". Every time that [DMEDevice isJailbroken] is now called in the application it will be replaced with our patch / tweak fooling the app telling it that it is not Jailbroken.
I have included a UI Alert so that we know our patch is being run, without this it can be difficult to tell that it has actually been called. You could remove this code once you are happy your tweak is working.
As we are using UIAlertView for a bit of debug we need to also include UIKit framework in our Makefile as well as a few other bits and pieces. Open up the Makefile in your project directory and add the following (some will already exist).
GO_EASY_ON_ME = 1
#The ip of your device that you will install the tweak on
export THEOS_DEVICE_IP=<YOUR DEVICE IP>
#The architecture you wish to compile for
export ARCHS=armv7
export TARGET=iphone:latest:4.3
export SDKVERSION = 6.1
include theos/makefiles/common.mk
TWEAK_NAME = isnotjailbroken
isnotjailbroken_FILES = Tweak.xm
# Add this line in so that the UIKit framework is included
isnotjailbroken_FRAMEWORKS = UIKit
include $(THEOS_MAKE_PATH)/tweak.mk
It's worth noting that when adding in a framework the tweakname must match as below in red:
TWEAK_NAME = isnotjailbroken
isnotjailbroken_FILES = Tweak.xm
# Add this line in so that the UIKit framework is included
isnotjailbroken_FRAMEWORKS = UIKit
It took me ages to spot isnotJailbroken had an uppercase J when debugging an error!!
Here is my Makefile..

Step 6 - Install and Run
The final step is to make, package and install the tweak on to the jailbroken device. from inside your project directory type the following:
#sudo make package install
This should compile and then install the patch on your jailbroken device. I have got public key auth set up on my iOS test device so that I am not prompted to enter a password, but you maybe prompted to enter your SSH password for the devices root account at this point.

Next launch the application and check that you get the alert pop up, if you do then your tweak / hook is being called :)

This is only very simple Jailbreak detection, other apps have started to mask when they are checking for jailbreak detection and exactly how they are doing it. I believe some MDM vendors regularly change the methods and the code that checks to keep hackers on their toes.
Wednesday, 29 May 2013
Remote Debugging iOS using lldb...
As per previous post, I attended HITB 2013 Amsterdam in April. I decided to do the mobile hacking course run by Blake Turrentine from HotWan, @Pod2g & @P0sixninja.
One thing I picked up from the course was the remote debugging of user land applications using lldb. In order to do this you need to have the following:
- A mac with Xcode installed
- Jailbroken Device (iOS.6.1) running ssh
- hdiutil attach /Applications/Xcode.app/Contents/Developer/Platforms/iPhoneOS.platform/DeviceSupport/6.1\ \(10B141\)/DeveloperDiskImage.dmg

- mkdir debug
- cd debug
- cp /Volumes/DeveloperDiskImage/usr/bin/debugserver .

- nano entitlements.plist
- copy and paste the text below into the terminal window
<plist version="1.0">
<dict>
<key>com.apple.springboard.debugapplications</key>
<true/>
<key>run-unsigned-code</key>
<true/>
<key>get-task-allow</key>
<true/>
<key>task_for_pid-allow</key>
<true/>
</dict>
</plist>
- press ctrl+x to quit, then Y to save and hit return to exit nano
- You should have something like below if you cat entitlements.plist

- If you don't want to make the entitlements file just download it from the link here
- codesign -s - --entitlements entitlements.plist -f debugserver

- hdiutil detach /Volumes/DeveloperDiskImage/

- Starting usbmuxd to forward local port 2222 on my mac to 22 on the remote device

- Use scp to copy to Device, when prompted enter the password for the root account on your Device (iPad / iPhone). You could use cyberduck or any file transfer application you have.
- scp -P 2222 debugserver root@localhost:/var/root

Step 7 - ssh onto the device, start the debugserver and select a port for the server to listen on:
- ./debugserver localhost:1234 --attach=<TheProcessNameYouWantToDebug>
dyld: Library not loaded: /Developer/Library/PrivateFrameworks/ARMDisassembler.framework/ARMDisassemblerReferenced from: /private/var/root/./debugserverReason: image not found

You need to start Xcode with the device connected via usb to your mac and navigate to Window > Organizer (or press cmd + shift + 2) then select the Devices and choose your device from the left hand side pane and ensure the device is configured for development (see apple developer documentation here)

Step 8 - If the debug server has started ok and is listening the terminal session will appear to hang as below:

If you are not enrolled in the Apple developer program and have no intention too then you can mount the "DeveloperDiskImage.dmg for 6.1" again (as per step 1) and copy the contents of /Volumes/DeveloperDiskImage/Library to the /Developer directory on the device. This worked for me before I realised you needed to enrol the device as a development device :)

Step 9 - If you are using usbmuxd you will need to ensure the port you just set the debug server to listen on is being forwarded from your mac over usb to the remote port (if you are using IP add to connect to the device you don't need to worry about this).

Step 10 - On your mac you can now start lldb
- sudo ./Tools/iPhone/usbmuxd/usbmuxd-1.0.8/python-client/tcprelay.py -t 1234:1234

- Type lldb at a command prompt
- Once lldb console has started type platform select remote-ios and hit enter.

- process connect connect://localhost:1234

Step 12 - You are now attached to the process and can debug using lldb commands
- register read
- bt

I need to do some more work with lldb as I have never really used it, I'm hoping this will be a useful way to look into some apps I have been wanting to reverse for a little while.
Subscribe to:
Posts (Atom)